I remember one of the first gluten free breads I bought from the supermarket after my coeliac diagnosis. It was expensive – about 3 times the price of normal glutenous bread – but it looked very promising and delicious. I hoped this lunchtime would be the moment that my children realised life was not going to change that much and that I could be reassured that our usual quick post-church Sunday lunch of bread rolls, pre-cooked chicken and salads could continue. And then we opened the bag and tasted it. It was dry and crumbly and just horrible. My high hopes came crashing down and it was one of the first of many moments of culinary despair I have had since going gluten free and realising just how wonderful gluten is for baked goods.
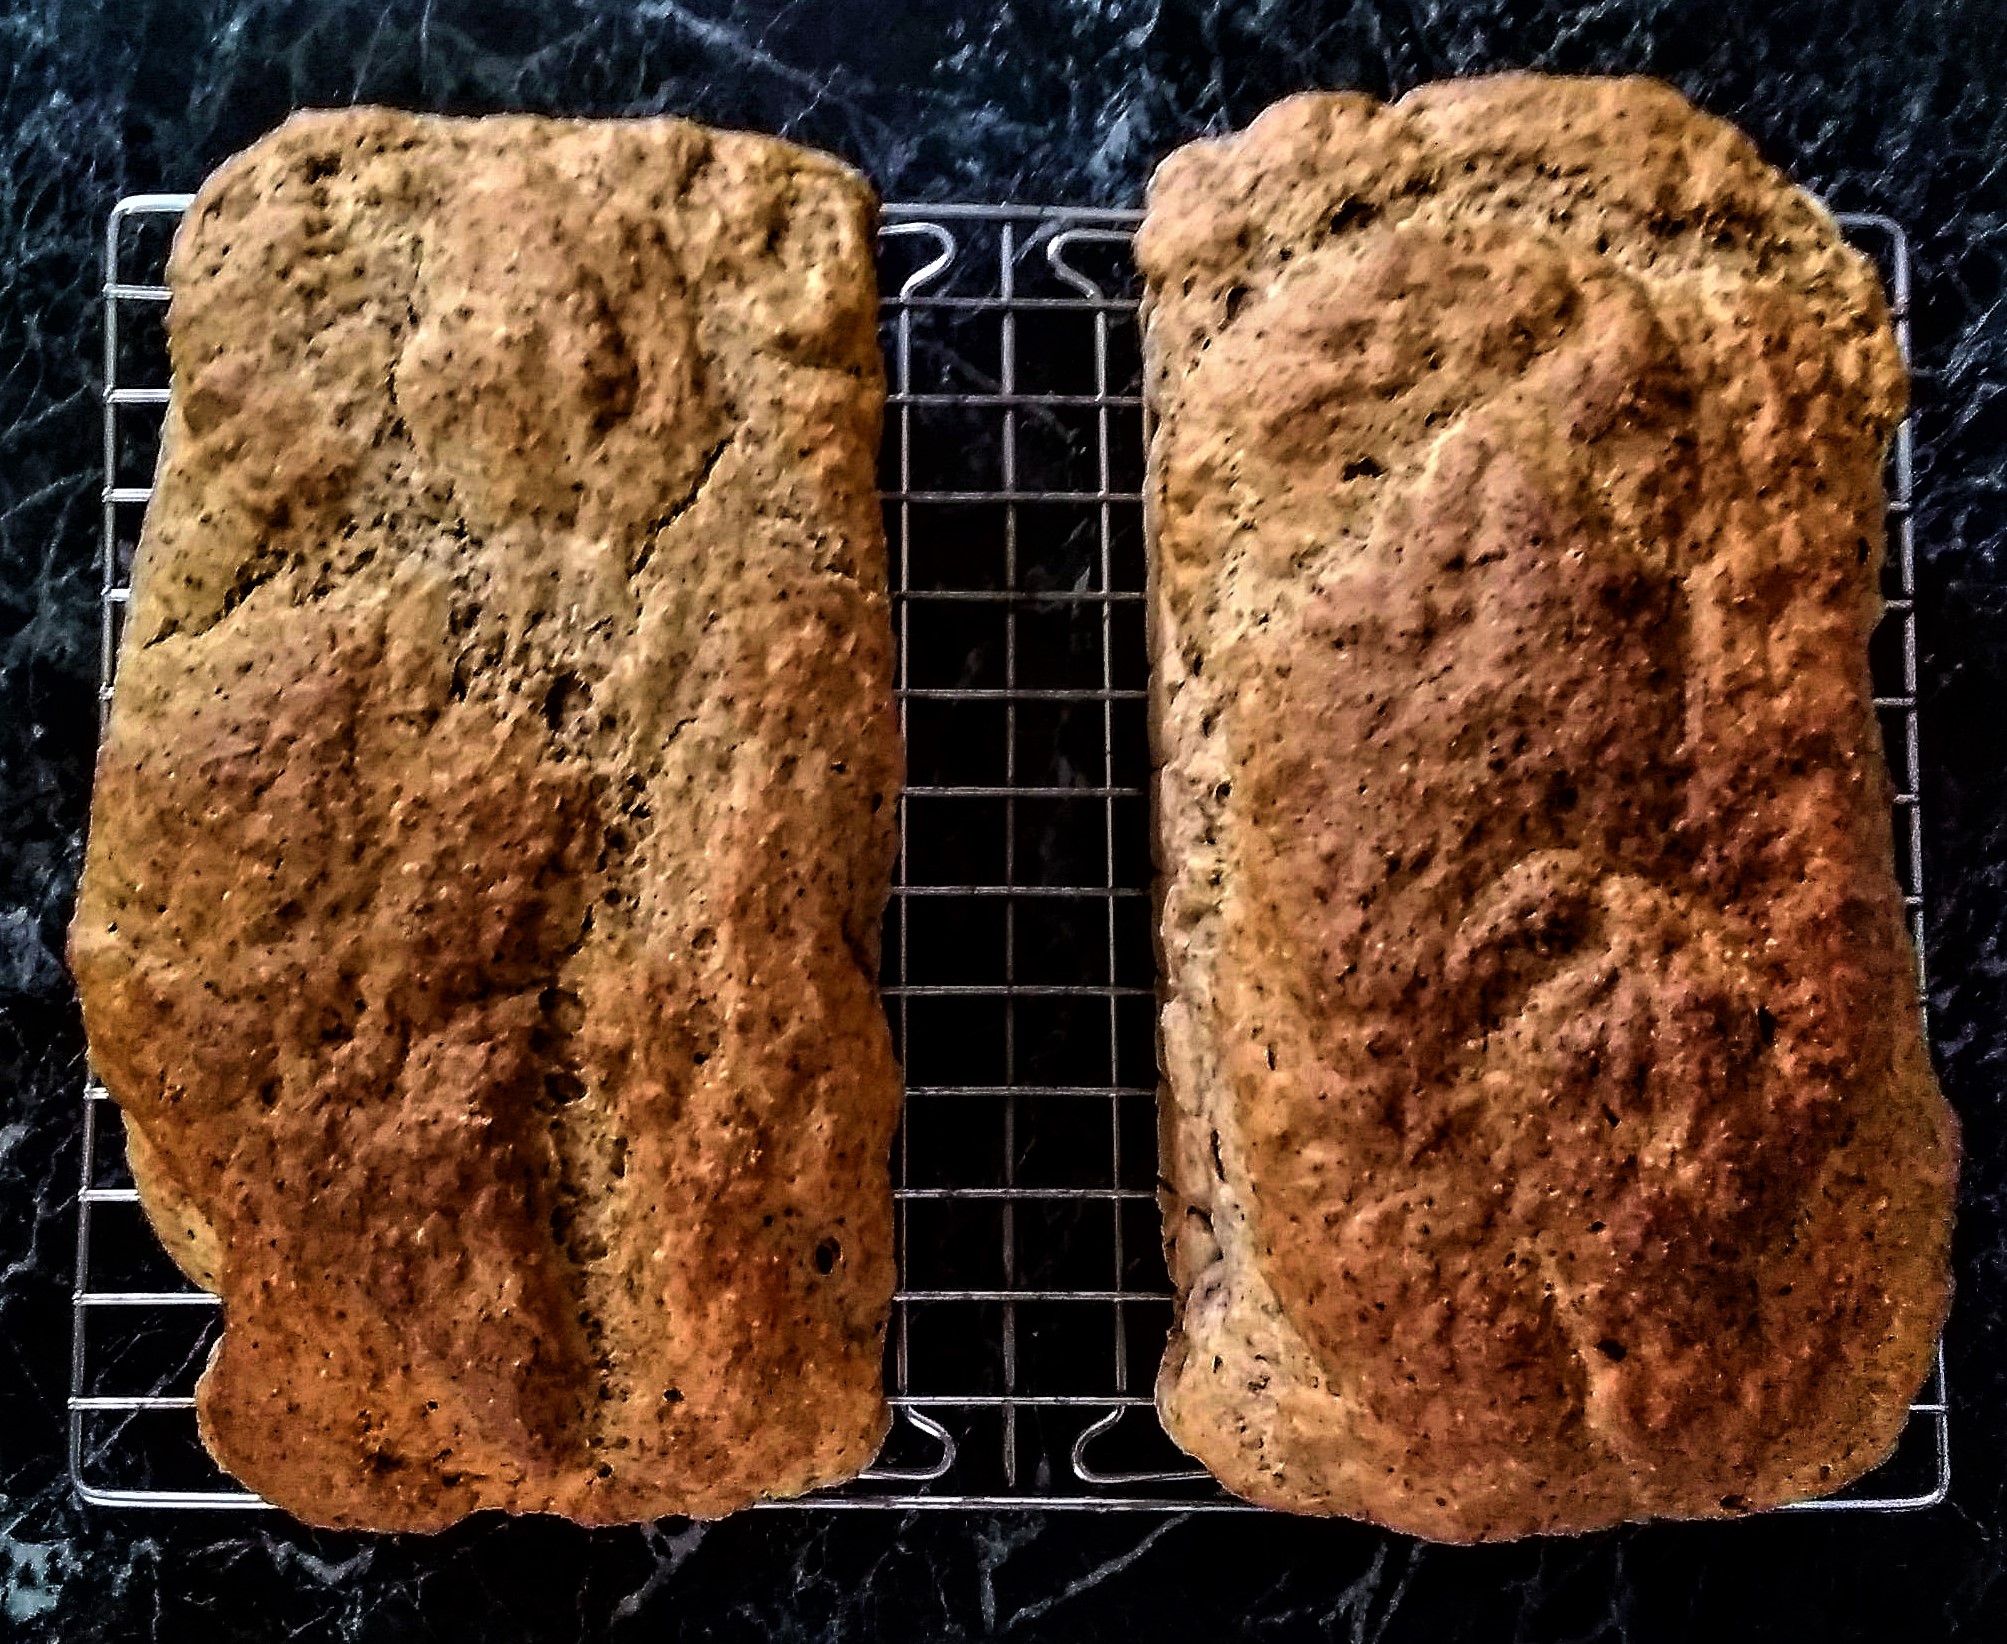
Over the subsequent few months we tried to keep gluten in the house and available for the rest of the family but, as is probably inevitable with small children – even ones that are very aware and very good about trying to avoid cross-contamination – I kept suffering symptoms of being mildly glutened and we eventually decided to make the whole family gluten free at home. I have missed soft, fluffy, gluten-filled bread a lot since then but, even as my memories of just how good that bread is are starting to fade, I still don’t find shop-bought gluten free bread very palatable. Add to that the fact that most of it is high in starches and white rice and generally pretty low in fibre or much nutrition and the end result is we only buy it in a real pinch. Over time, the bread gap in our diet has been filled with maize-meal porridge, homemade granola and lots of baked potatoes (a great lunch option which everyone enjoys!) but there are times when we still really want bread, particularly my peanut-butter-and-jam-toast loving son. After lots of experimentation and with my growing understanding of gluten free ingredients, I have finally come up with this – a gluten free bread that smells awesome, is soft and fluffy, rises high and is good enough that I feel able to serve it to gluten-eating guests without the need to apologise in advance. It is best eaten on the day it is made, once it has cooled down and firmed up, but it is even good the next day. It is great as bread or toast and can be used for sandwiches provided the slices are doorstop size rather than dainty tea-party size.
Ingredients and substitutions
This recipe has a very long ingredients list but don’t let that put you off. The method itself is actually very simple and you’ll only need one bowl. This is also a very flexible recipe and can be adapted to what you have available – at my most limited (I really needed to visit the supermarket!), I left out the psyllium husk and apple cider vinegar and substituted the eggs for aquafaba and still ended up with a pretty good loaf! I’ll try to cover various substitutions here but feel free to experiment too – gluten free baking is still a relatively new frontier and the more you experiment and get to know and understand ingredients for yourself the more you’ll be able to adapt recipes to suit your own preferences and ingredients. And you’ll probably learn more from mistakes than from successes in the process. And if, during that process, the bread ends up gummy or too dry, I recommend trying one of my two alternatives to throwing away bread failures- either turn it into French toast or cube it and bake it in generous quantities of garlic butter as croutons which you can then freeze to use in salads or on soups.
Flour and starches
This relies heavily on buckwheat flour but I have substituted up to half the buckwheat flour with millet flour or sorghum flour at different times and still had good results. I have chosen the tapioca starch and potato starch for specific reasons (tapioca to boost the stretch of the dough and potato starch to help make the bread softer and more able to keep beyond the day it is made) but this bread may still work if you need to substitute either of these starches with the other starch or a different starch like cornflour – if you do this, please let me know how it goes!
No psyllium husk?
This shouldn’t be too much of a problem if you can include all or most of the other gluten-replacing binders (the linseeds, chia seeds and eggs).
Out of linseeds or chia seeds?
I have made this without the chia seeds and had it work pretty well. As there are more linseeds than chia seeds, I think you would need to replace them with something else if you don’t have them. In the first instance I would recommend a direct substitution with the same quantity of chia seeds.
Egg-free?
I have made this with aquafaba (the water from a can of chickpeas) instead of the eggs without a problem – I just substituted the aquafaba from 1 can of chickpeas (which filled about ¾ of a cup) for the eggs.
Dairy free?
This bread was okay when I first made it with water only and no milk but it is better with the extra protein boost the milk provides – as the milk is only there to boost the protein content, I think you should be able to do a direct substitution with non-dairy milk without a problem if you are dairy free.
No apple cider vinegar?
I have made this bread without apple cider vinegar and it is still pretty good. The vinegar does help to create an ideal environment for the yeast to do its job and get the loaf risen though so it is best to put it in if you have it.
Running low on baking powder?
If, in these days of COVID shortages, you are running low on baking powder, you can reduce the amount used to 1 teaspoon, though this may mean that the loaf doesn’t rise as well.
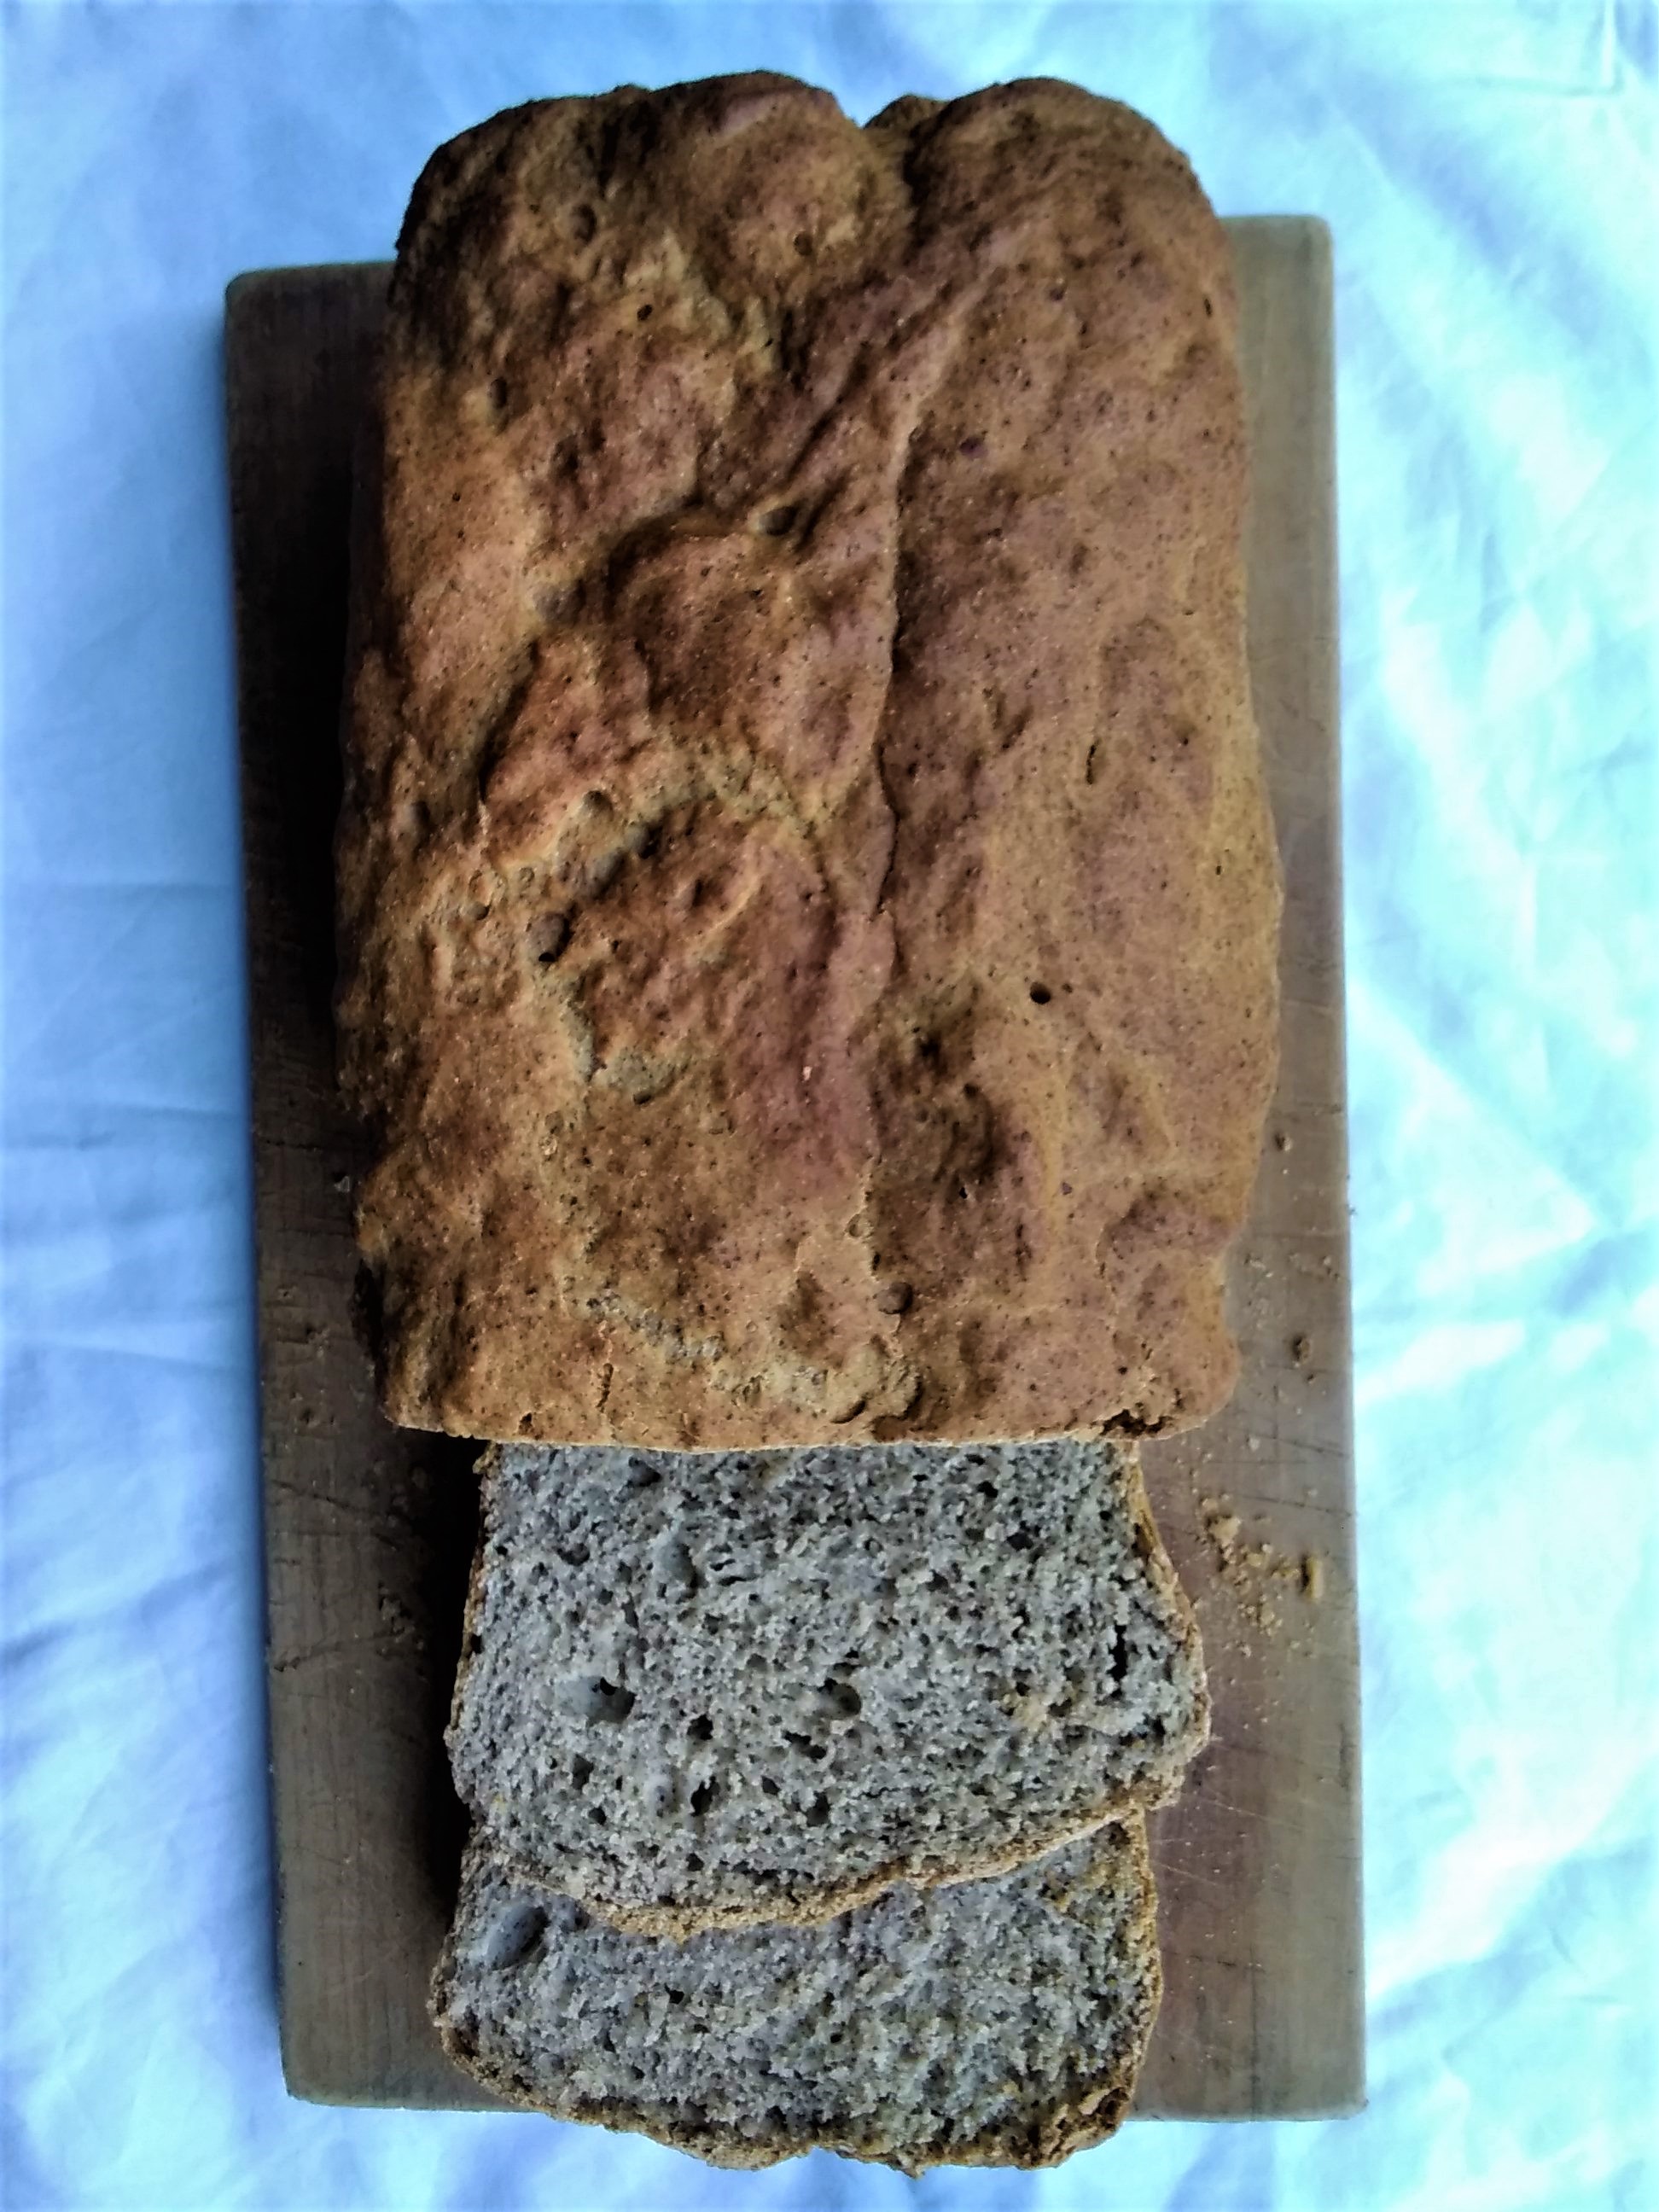
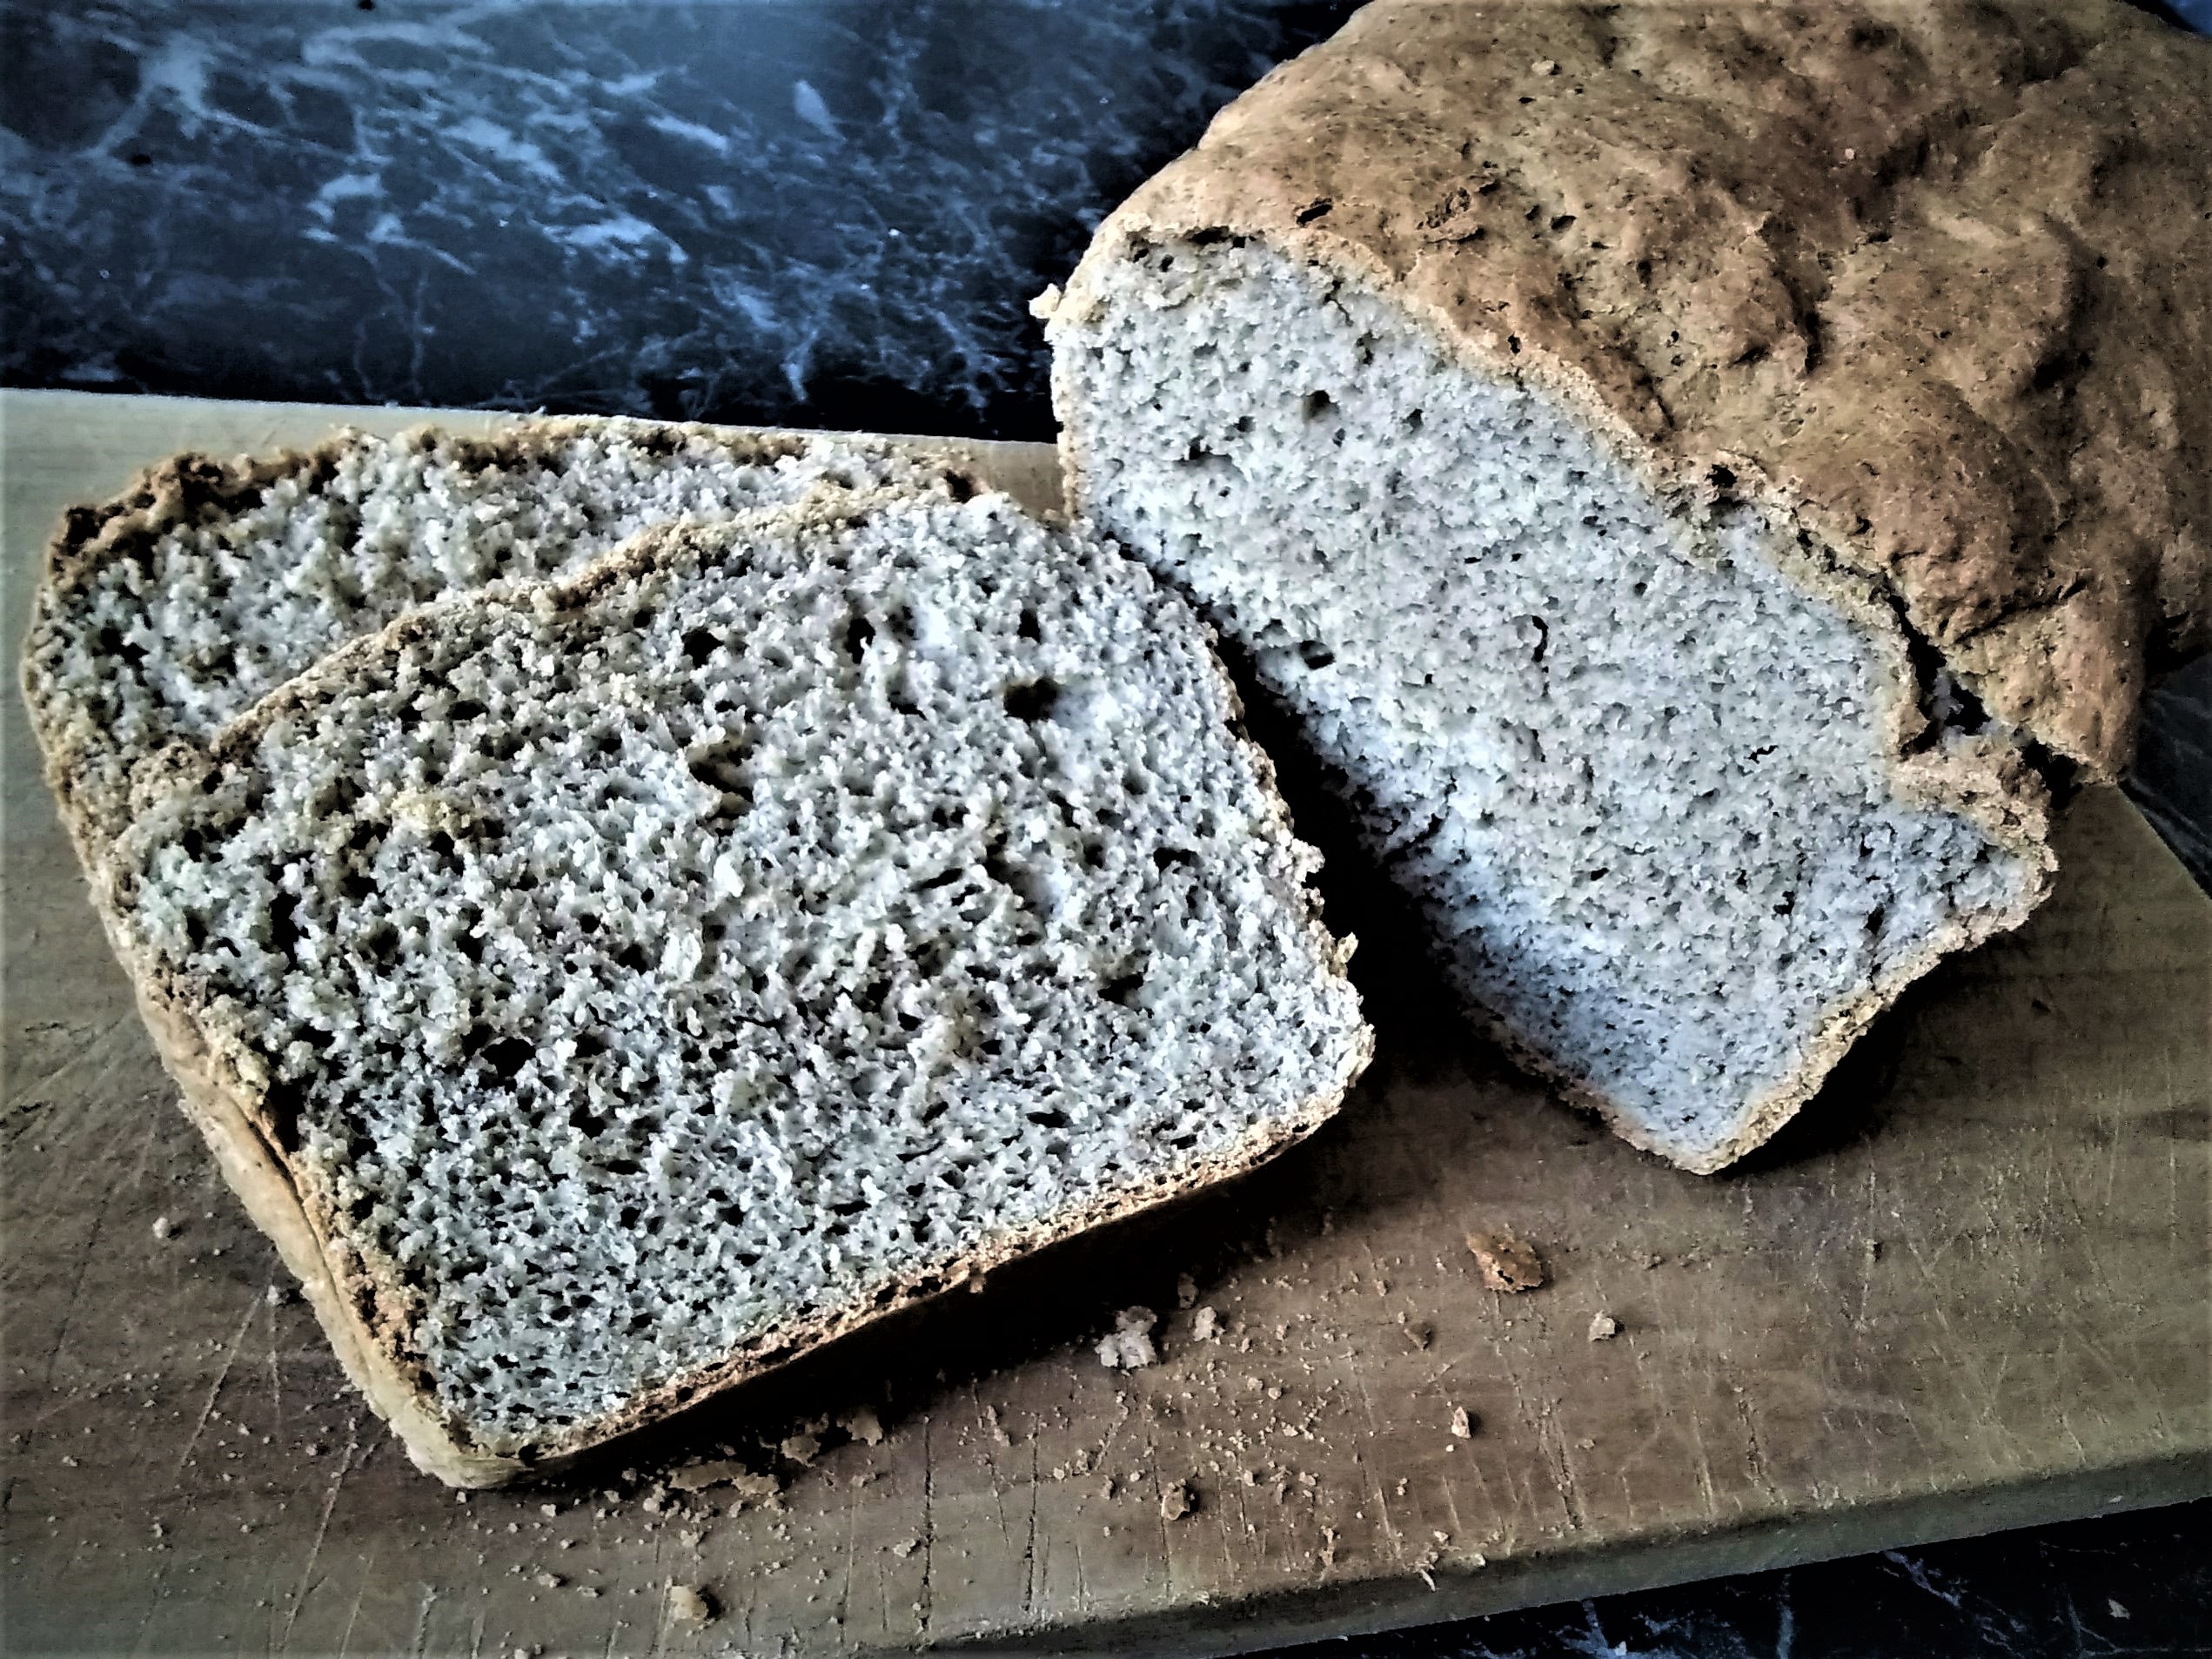
This makes one loaf in an 11 x 25 cm loaf tin. To make two loaves, simply double all the ingredients and follow the same instructions. I haven’t yet tried freezing this – we normally eat it within two days, even when I make two loaves, and so I haven’t yet had the chance to try freezing it. I used my stand mixer to mix this but you should be able to mix it with a hand mixer or by hand – if you do this just take the time to ensure that everything is mixed together thoroughly before spooning the batter into the loaf tin. The recipe below is based on a 250 ml mug as equal to 1 cup. I use the scoop and level method of measuring ingredients (scoop the ingredients into the measuring cup and then level them off with a spoon). Where I use spoons the ingredients are usually slightly rounded at the top of the spoon.
What you’ll need
3 dessertspoons linseeds
1 dessertspoon chia seeds
¾ cup boiling water
¾ cup milk
2 dessertspoons yeast
2 cups buckwheat flour (see note above if you want to substitute some of the buckwheat flour for a different flour)
½ cup potato starch
½ cup tapioca starch
1 dessertspoon psyllium husk
Generous pinch of salt
3 teaspoons baking powder
1 dessertspoon apple cider vinegar
3 dessertspoons mild olive oil (or any other mildly flavoured or flavourless oil)
3 eggs
What to do:
1. Line a loaf tine with baking paper or grease thoroughly with oil or butter (I prefer baking paper to ensure that the bread does not stick to the pan).
2. Grind the linseeds and chia seeds until medium to finely ground. I use a spice/coffee grinder for this.
3. Put the ground seeds in your mixing bowl and add the boiling water and milk. Mix together thoroughly and then add and mix in the yeast. Set aside the bowl for about 5 minutes to give the seeds a chance to form a gel and the yeast a chance to activate.
4. Add to the mixing bowl all the remaining ingredients (flours, starches, psyllium husk, salt, baking powder, apple cider vinegar, oil and eggs) and mix everything together thoroughly. The dough will be roughly the consistency of sponge cake batter.
5. Spoon the dough into the prepared loaf tin and set aside to rise until risen to about one and a half to twice its original height. I do this in the oven with the light on and a small ramekin at the bottom to create a steamy environment ensure that the dough doesn’t go hard at the top – I originally tried covering the dough with a damp tea towel but unfortunately it stuck to the tea towel and so didn’t have the lovely smooth top I had been hoping for!
6. When the dough has risen, turn the oven on to 180°C and bake in the middle of the oven until done. This usually takes about 40 – 45 minutes and when done the bread will be a golden brown and will sound hollow when tapped.
7. When the bread is done, take it out of the oven and tip it out of the pan onto a cooling rack and ideally leave to cool fully before eating.